

How to Manage Teams, Roles, and Permissions in xCloud
Updated September 28, 2026 · 7 min read
xCloud teams let you collaborate without sharing the team owner’s account. Each member receives a role, access to specific servers or sites, and only the permissions needed for their work.
This guide explains the complete team-management workflow: creating and switching teams, inviting members, accepting or declining invitations, managing roles and resource access, removing members, leaving teams, and deleting teams.
Prerequisites
- An active xCloud account.
- A plan that supports additional teams or team members for the actions you want to perform.
- Team Owner or Team Admin access to invite or manage members.
- The email address of each person you want to invite.
- At least one server or site in the team if you want to grant access to selected resources only.
Open Team Management
- Sign in to the xCloud dashboard.
- Open your account menu and select All Team.
The All Team page shows:
- Your personal team, marked Primary.
- Other teams you own.
- Teams you have joined.
- Pending invitations from other teams.
The team you switch to becomes your current workspace and displays that team’s resources and members.
Create a team
- Open All Team.
- Select Add New Team.
- Enter a Team Name and Team Email.
- Optionally add Tags and a team avatar.
- Select Save Changes.
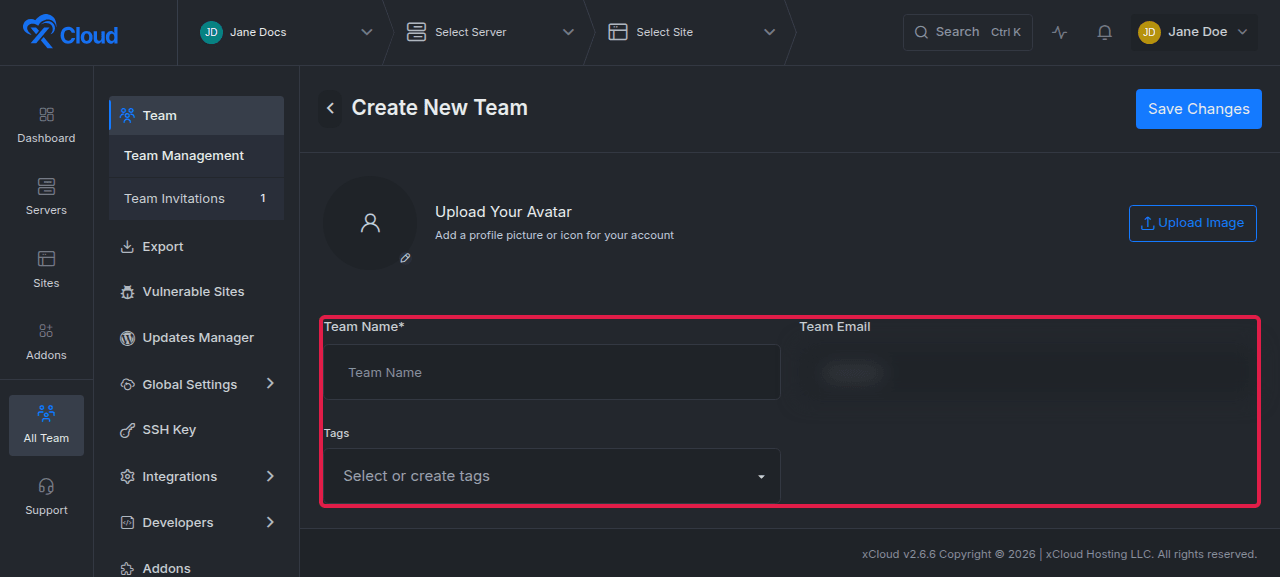
Expected result: xCloud creates the team and lists it on the All Team page. You are the team owner.
Understand team roles
A role sets the maximum permissions a member can receive. Resource access then limits which servers or sites the member can use.
| Role | Intended access |
|---|---|
| Owner | Full team control, including team deletion and owner-level billing responsibilities. The owner is created with the team. |
| Team Admin | Broad team, provider, server, site, and support capabilities allowed by the role. Team Admins can perform supported team-management actions. |
| Server Admin | Manages permitted servers, their sites, and the server-level actions enabled for the role. |
| Site Admin | Manages permitted sites and the site-level actions enabled for the role. |
The role is only one part of access control:
- Role sets the member’s maximum capability.
- Resource access determines which servers or sites the member can reach.
- Role permissions determine which allowed actions the member can perform on those resources.
Invite a team member
1. Open the team
- Go to All Team.
- Open the menu for the team you want to manage.
- Select Manage Team.
- Select Add New Member.
Expected result: xCloud opens the invitation form with fields for the member’s email address, role, resource access, and role permissions.
2. Enter the member and choose a role
- Enter the member’s email address.
- Under User Role, select Team Admin, Server Admin, or Site Admin.
The form displays server access for Team Admin and Server Admin, or site access for Site Admin.
3. Choose server or site access
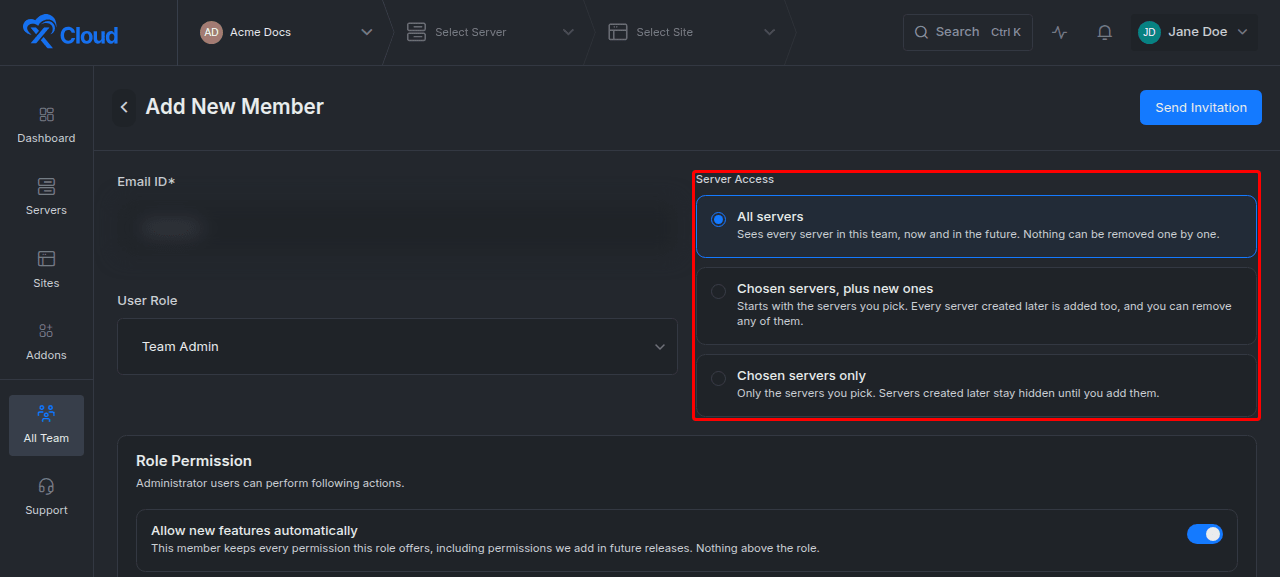
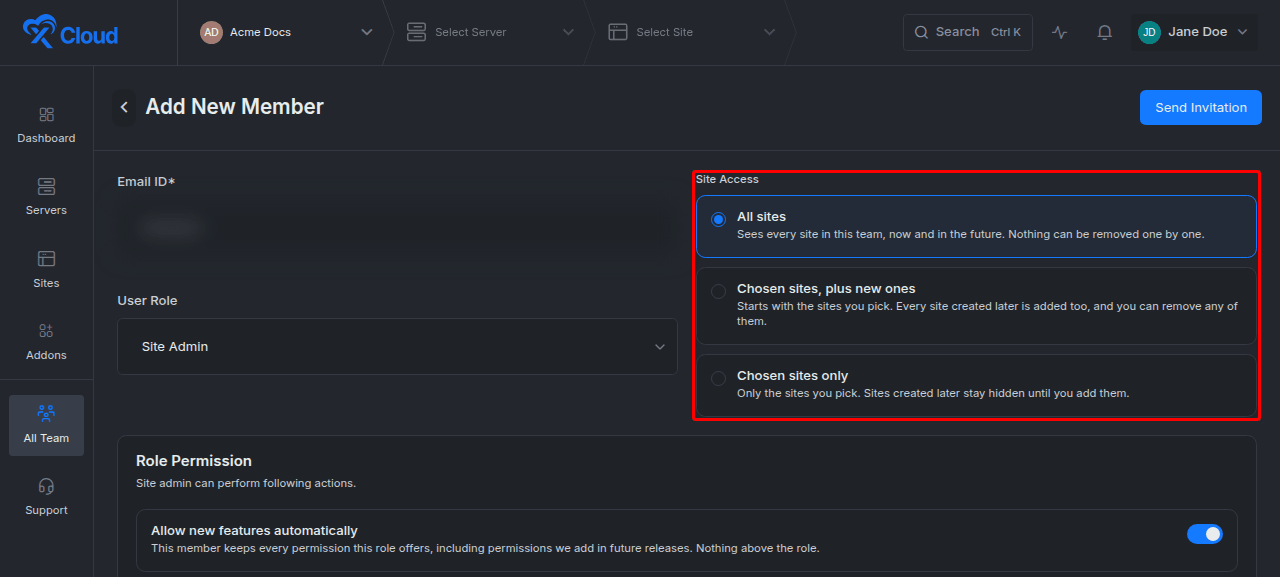
Choose one of three resource-access modes:
| Access mode | Current resources | Resources created later | Individual selection |
|---|---|---|---|
| All servers/sites | Every resource in the team | Added automatically | Blanket access; individual resources cannot be excluded |
| Chosen servers/sites, plus new ones | Only the resources you select | Added automatically | Selected resources can be changed later |
| Chosen servers/sites only | Only the resources you select | Not added automatically | Future resources stay hidden until selected manually |
For Team Admin or Server Admin, configure Server Access. If you choose a selected-resource mode, use the picker to add the initial servers.
For Site Admin, configure Site Access and select the initial sites when required.
4. Configure role permissions
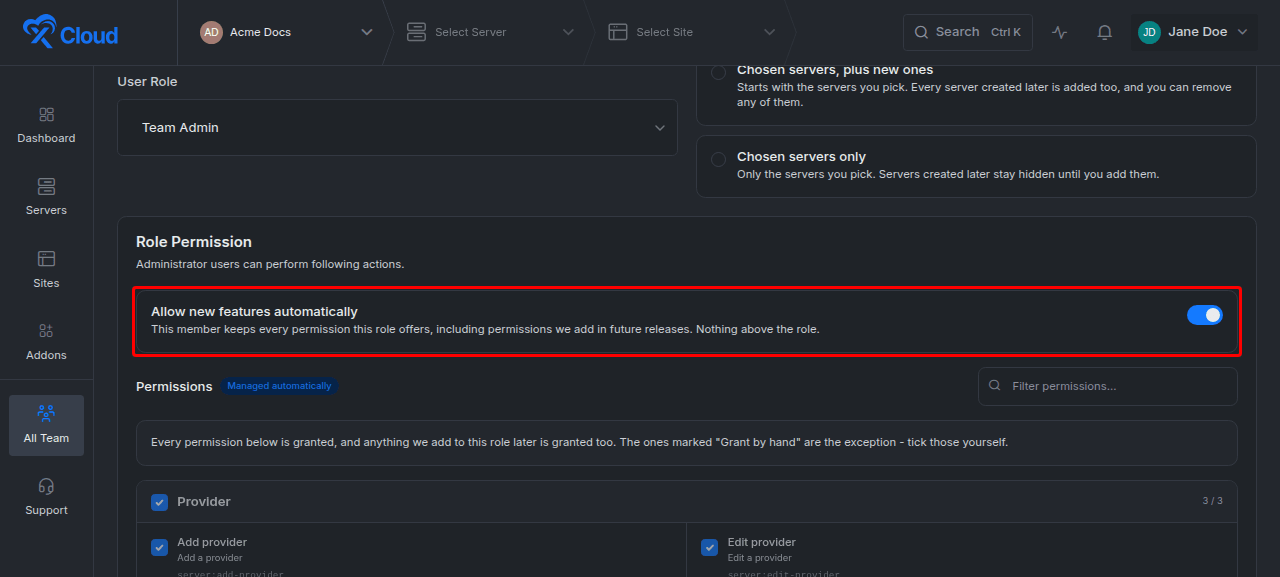
Use Allow new features automatically to decide how permissions offered by the selected role are maintained.
| Setting | Behavior |
|---|---|
| Enabled | Grants every automatically managed permission offered by the selected role, including eligible permissions added to that role in future releases. It never grants permissions above the selected role. |
| Disabled | Lets you select the currently available permissions individually. Future permissions are not added automatically. |
Permissions labeled Grant by hand remain manual even when automatic management is enabled. Select each of those permissions separately when the member needs it.
5. Send the invitation
Review the email address, role, resource access, selected resources, and permissions. Then select Send Invitation.
Expected result: The invitation appears in Team Management as pending until the recipient accepts or declines it.
Accept or decline another team’s invitation
When another team invites you, the pending invitation appears on your All Team page.
- Open All Team.
- Find the invitation under the pending invitations section.
- Select Accept to join the team, or Decline to reject the invitation.
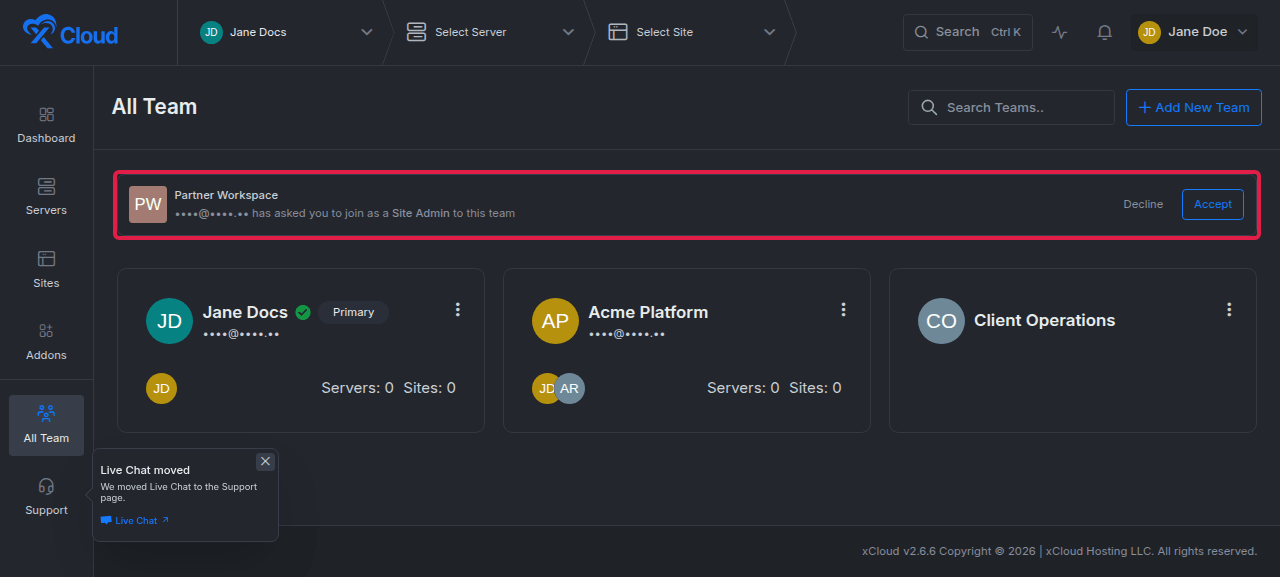
Expected result: After you accept, the team appears in your team list and you can switch to it. Declining removes the invitation without adding you to the team.
Change a member’s role, access, or permissions
- Open All Team and select the team.
- Find the member on the Team Management page.
- Select Change Role.
- Update the role, server or site access, selected resources, or role permissions.
- Select Save Changes.
Expected result: xCloud applies the updated role boundaries, resource access, and permission settings to the membership.
When you change a member’s role, review every setting again. Site Admin uses site access, while Team Admin and Server Admin use server access, so the available resource selector changes with the role.
Remove a team member
Removing a member detaches them from the team and removes access granted through team, server, or site invitations. It does not delete the person’s xCloud account.
- Open the team from All Team.
- Find the member on the Team Management page.
- Confirm that you selected the correct member.
- Select Delete beside that member.
- Confirm the removal when prompted.
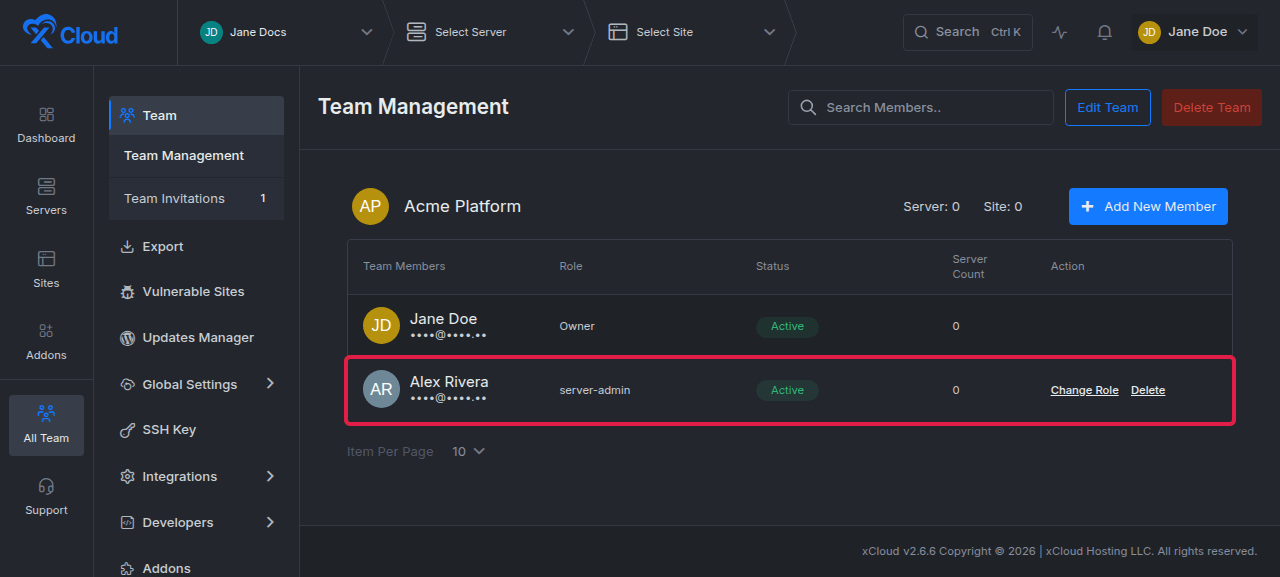
Expected result: The member disappears from the team list, and their team, server, and site access associated with that membership is removed. Their xCloud account is not deleted. The team owner cannot be removed as a member.
Switch to another team
- Open All Team.
- Open the menu for the team you want to use.
- Select Switch to Team.
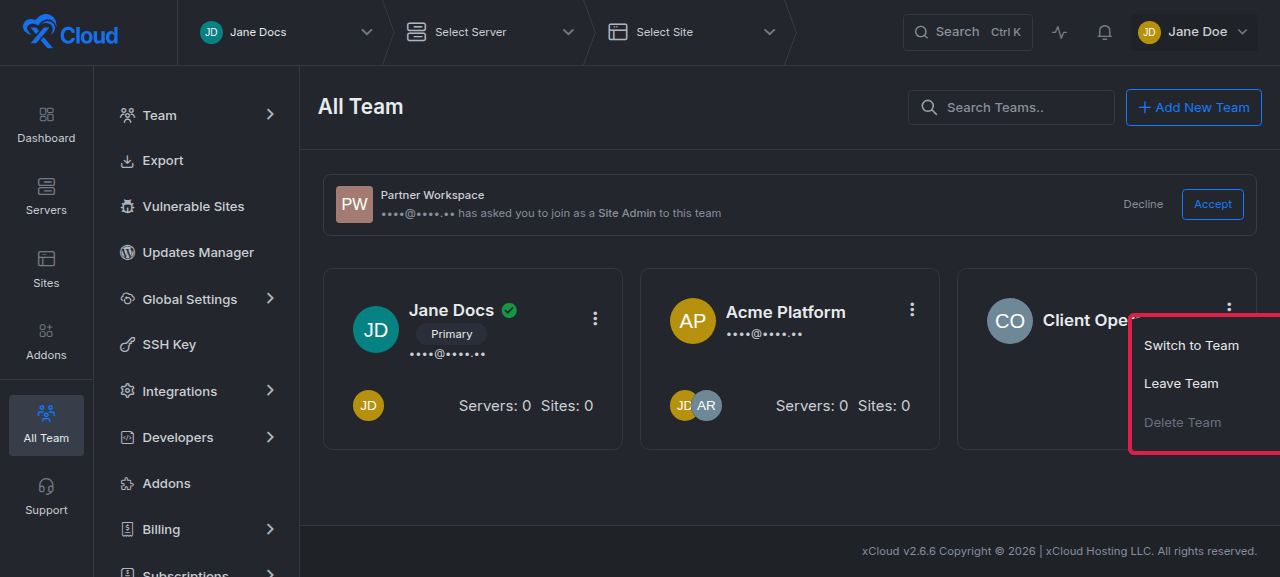
Expected result: xCloud changes your current workspace to the selected team and loads that team’s resources.
Leave a team
You can leave a team you joined, but you cannot leave a team you own.
- Open All Team.
- Open the menu for the joined team.
- Select Leave Team.
- Confirm the action.
Expected result: The team is removed from your team list and your access to its servers and sites ends.
If you need to leave the team that is currently active, switch to another team first.
Edit a team
Team owners and authorized Team Admins can update supported team details.
- Open All Team.
- Open the menu for the team.
- Select Edit from the team menu, or select Edit Team from the team’s management page.
- Update the available team details.
- Select Save Changes.
Expected result: xCloud updates the team’s displayed information without changing its owner or memberships.
Delete a team
Warning: Deleting a team is irreversible. xCloud removes the team’s services, sites, and other associated data, and that data cannot be recovered. Back up anything you need before continuing.
Only a deletable team that you own can be removed. You cannot delete your personal team or your current team. Switch to another team first if Delete Team is unavailable because the target is current.
- Open All Team.
- Open the menu for the team you own and select Delete Team. You can also open the team and use Delete Team from its management page.
- Read the deletion warning.
- Select the acknowledgement checkbox.
- Enter the exact team name.
- Select Delete.
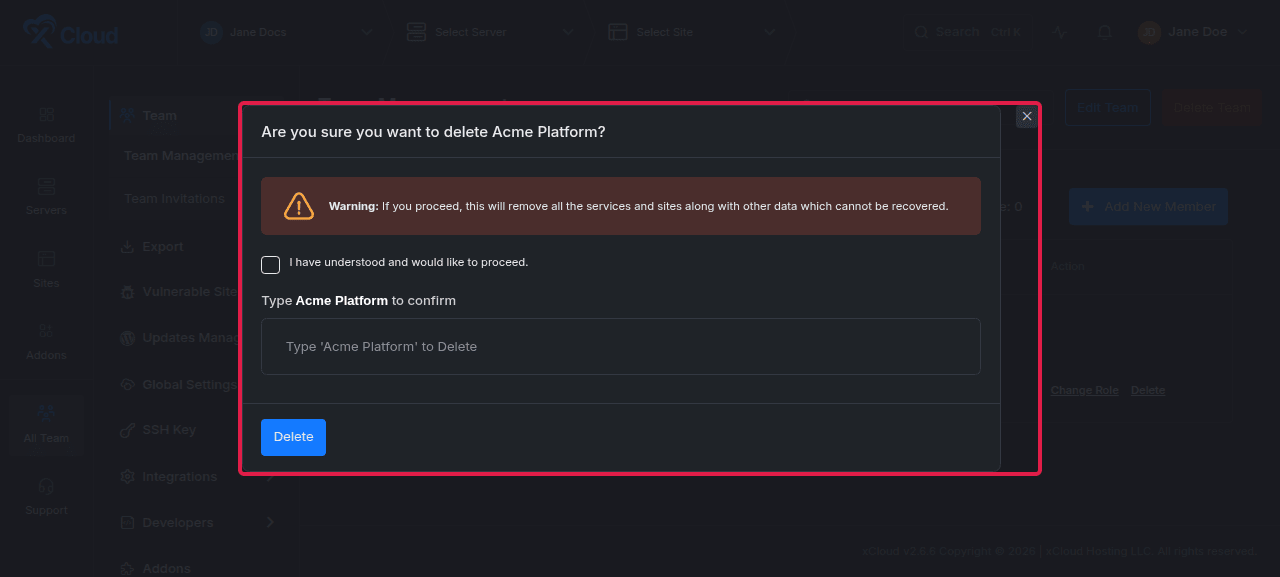
Expected result: xCloud permanently removes the team and its associated resources and data.
Limits and edge cases
- Additional team members are unavailable on the Free plan. Upgrade the team before inviting members.
- Team-member limits depend on the team’s plan.
- All servers/sites includes current and future resources; individual resources cannot be excluded in this mode.
- Chosen servers/sites, plus new ones adds future resources automatically while retaining individual resource control.
- Chosen servers/sites only never adds future resources automatically.
- Automatic permission management remains limited by the selected role.
- Permissions labeled Grant by hand are never granted automatically.
- Ownership, team deletion, and owner-level billing responsibilities remain with the team owner.
- You cannot delete your personal team or the team that is currently active.
Troubleshooting
| Problem | What to check |
|---|---|
| Add New Member is unavailable | Confirm that your plan supports additional members, the team has not reached its member limit, and you have Team Owner or Team Admin access. |
| A member cannot see a server or site | Check both the member’s resource-access mode and the selected server or site. Role permissions alone do not grant resource visibility. |
| A member can see a resource but cannot perform an action | Open Change Role and confirm that the required role permission is enabled. Check Grant by hand permissions separately. |
| A newly created resource is hidden from a member | Use All servers/sites or Chosen servers/sites, plus new ones, or add the resource manually to a chosen-only membership. |
| Delete Team is disabled | Confirm that you own the team, that it is not your personal team, and that it is not your current team. |
| Leave Team is unavailable | Team owners cannot leave teams they own. Joined teams show Leave Team when leaving is allowed. |
FAQ
Does automatic permission management give a member every xCloud permission?
No. It grants only automatically managed permissions offered by the selected role, including eligible permissions added to that role later. It does not grant higher-role permissions or items labeled Grant by hand.
What is the difference between “plus new ones” and “only”?
Both modes start with the resources you select. Plus new ones automatically adds resources created later; only keeps future resources hidden until you add them manually.
Can I exclude one server or site while using “All” access?
No. All servers/sites is blanket access. Use one of the chosen-resource modes when you need individual exclusions.
Can I change access after an invitation is accepted?
Yes. Open the member from Team Management, select Change Role, update the role, resource access, selected resources, or permissions, and save the changes.
Does removing a member delete their account?
No. It removes the membership and access associated with that team. The person’s xCloud account remains available to them.
Can I transfer team ownership from Team Management?
The team-management controls covered in this guide do not include an ownership-transfer action.
Next steps
Review team membership regularly, especially after creating new servers or sites, changing a member’s responsibilities, or enabling automatic access to future resources. Remove members who no longer need access and keep destructive team deletion as a last resort.