

How to Create Your First WordPress Site with xCloud
Updated September 27, 2026 · 7 min read
xCloud’s app-first workflow lets you choose WordPress before you choose server infrastructure. It then shows compatible existing servers or lets you create a compatible managed server without leaving the site-creation journey. This guide is for new xCloud users who want to launch a WordPress site and understand the server choice, plan review, and live-domain HTTPS behavior before they create it.
Prerequisites
- An active xCloud account with permission to create sites.
- A domain you control if you plan to use a live domain.
- Either a compatible existing server in your current xCloud team or permission to create an xCloud managed server.
- A billing method if the selected managed-server path requires a paid plan.
- Your preferred WordPress administrator username and a safe email address.
Create a WordPress site
Step 1: Open the app catalog
From the xCloud dashboard, go to Sites → New Site. xCloud opens the app catalog with the prompt What would you like to host today?
Expected result: You see WordPress, Custom App, One-Click Apps, and AI Agent choices rather than being asked to choose a server stack first.
Step 2: Select WordPress
Select the WordPress card.
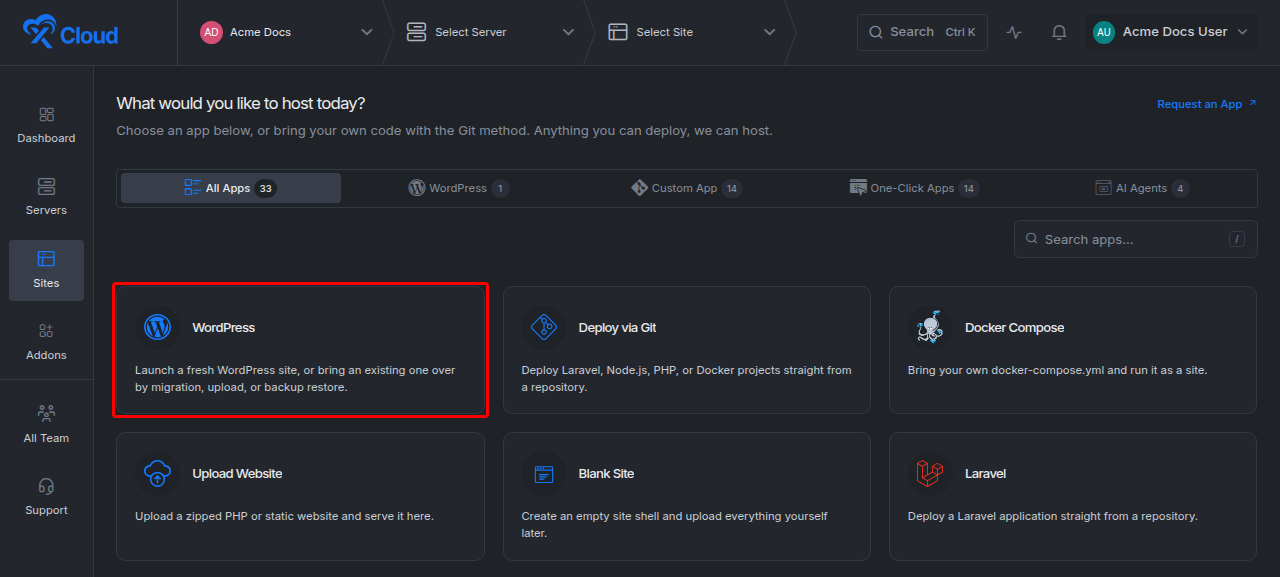
Expected result: xCloud opens the WordPress setup page and displays the available starting methods.
Step 3: Choose how to start the WordPress site
Select the method that matches your task:
| Starting method | Use it when |
|---|---|
| Install New WordPress Website | You want xCloud to create a new WordPress installation. |
| Migrate An Existing WordPress Website | You are moving an existing WordPress site into xCloud. The current interface marks this option as Beta. |
| Manually Upload Website | You will upload an existing site manually. |
| Migrate Full Server | You need to move supported server workloads rather than one site. |
| Recreate Site from Backup | You have an eligible backup that should become the new site. |
For a new site, select Install New WordPress Website.
Expected result: The selected method is highlighted, but Continue remains unavailable until you also choose where the site will run.
Step 4: Choose where WordPress will run
In Where should it run?, choose one destination:
- Deploy on a new server— creates a compatible managed server as part of this workflow. xCloud marks this path as Recommended.
- A compatible existing-server card — uses a server that xCloud has already determined can run the selected app. Server cards include site-count context to help you judge current usage.
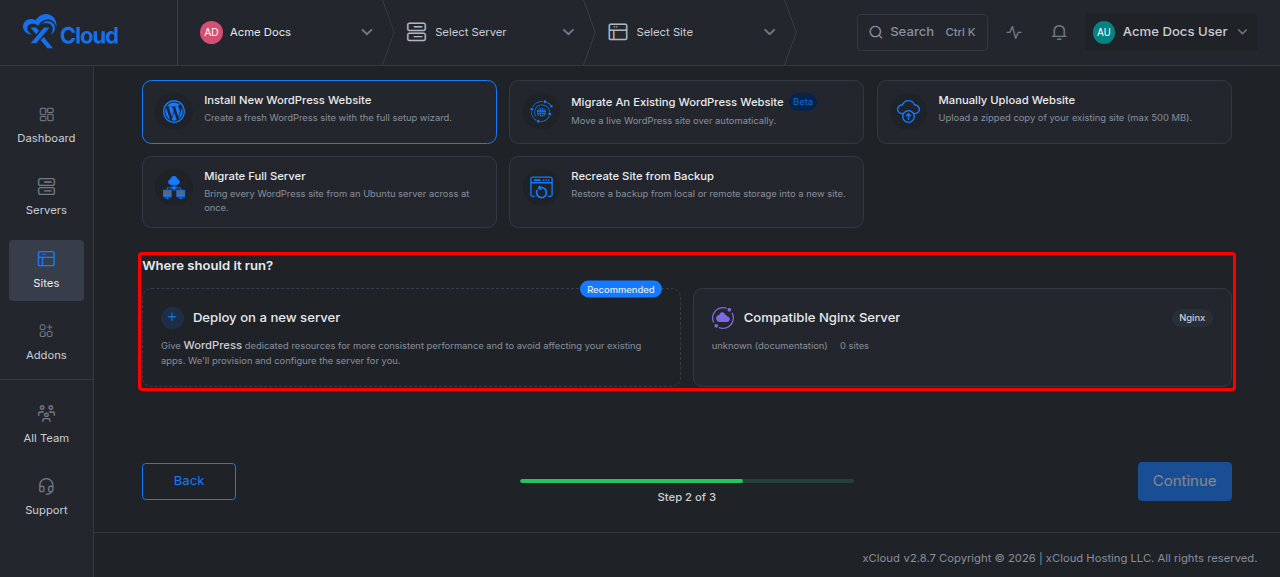
Expected result: Selecting both a starting method and a destination enables Continue.
Use a compatible existing server
Step 5: Select the compatible server card
Choose the existing server card, then select Continue.
Expected result: xCloud opens the WordPress configuration form for that server. If an expected server does not appear, do not force the selection; use the managed-server path or review the server’s stack and available resources.
Step 6: Enter the WordPress and domain details
Complete the required site fields, including the site title, domain choice, and WordPress administrator details. Review optional settings such as multisite, DNS, and blueprints only when they apply to your site.
Expected result: Required fields are complete and the site can proceed to the final review or creation action.
Step 7: Choose the domain mode
Choose a live domain when DNS is ready, or use the available temporary/demo option when you are not ready to point the production domain.
Expected result: For a live domain, xCloud enables HTTPS by default during site creation. You still need to use a domain you control and complete any DNS action shown by xCloud.
Create a compatible managed server in the site flow
Step 8: Select Deploy on a new server
Return to Where should it run?, select Deploy on a new server, and continue.
Expected result: xCloud opens managed-server creation while retaining WordPress as the app to install.
Step 9: Enter server basics and select a web server
Enter a clear server name, add an optional tag if needed, and choose the supported web-server option for your workload. The current setup interface offers NGINX,OpenLiteSpeed,Docker + Nginx, and Agentic choices; use the option xCloud presents as compatible with the selected app.
Expected result: The server configuration reflects the intended WordPress workload.
Step 10: Compare plans before selecting one
Review the General,Premium, and Dedicated plan tabs and compare their listed CPU, memory, storage, and transfer resources. Select a plan sized for the number and traffic profile of the sites you intend to host.
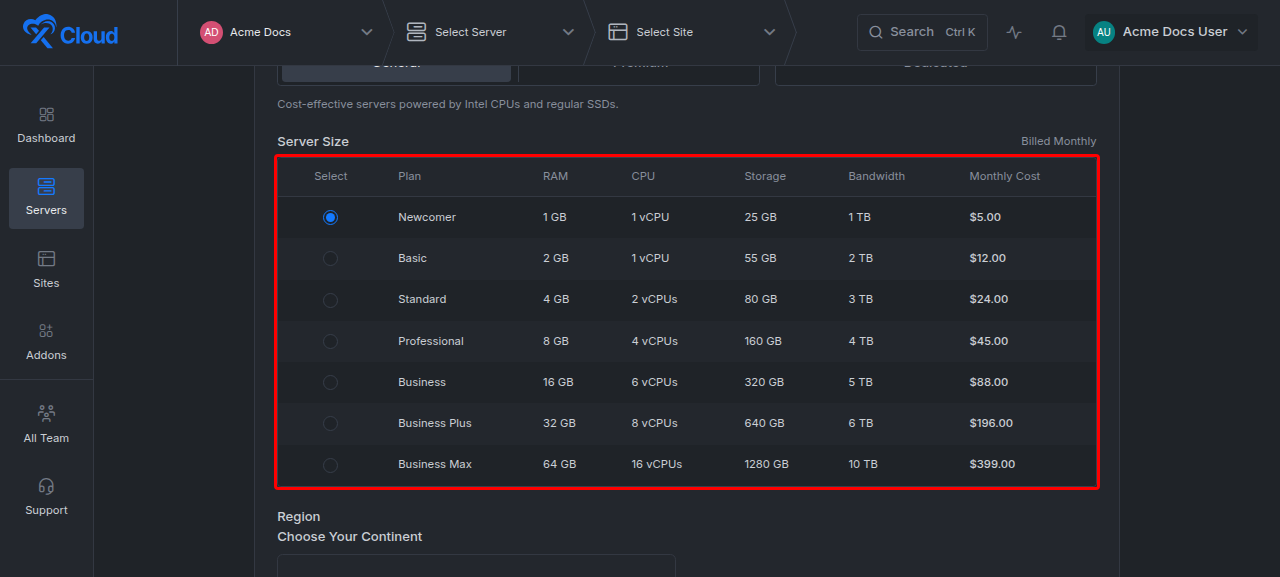
Expected result: One server plan is selected and the setup journey can continue.
Step 11: Review region, term, backup, and price
Choose the required region, then review every billing term, backup option, and price shown before you confirm the managed server. Do not rely on a screenshot or a previously quoted amount because available plans and prices can change.
Expected result: The final selection matches your workload, location, backup needs, and current displayed price.
Step 12: Complete the WordPress details and create the site
Continue to the WordPress configuration, enter the required site and administrator details, then review the summary before choosing the final creation action.
Expected result: xCloud begins the server/site creation workflow using the app, infrastructure, and domain choices you reviewed.
Verify the setup
Confirm all of the following after creation finishes:
- The site appears under Sites in the expected team.
- The site is attached to the server you selected or created.
- The WordPress administration URL opens.
- The public site opens using the domain or temporary URL selected during setup.
- A live domain loads over HTTPS.
- The server plan and backup selection match the values shown during checkout.
Troubleshooting
| Symptom | Likely cause | Fix |
|---|---|---|
| Continue is disabled on the WordPress setup page. | A starting method or destination has not been selected. | Select both Install New WordPress Website and either Deploy on a new server or a compatible server card. |
| An existing server is not shown. | xCloud does not consider that server compatible with the selected app, or it lacks suitable resources. | Use a server card that xCloud lists, or create a compatible managed server from the same flow. |
| The wrong server flow opens. | The destination card selected on the previous screen does not match your intent. | Go back to Where should it run? and choose the correct card. |
| A live domain does not resolve. | Domain DNS is not yet pointing to the new site, even though HTTPS is enabled by default in the creation flow. | Complete the DNS action shown by xCloud and wait for DNS propagation before checking again. |
| The displayed price differs from an older guide or screenshot. | Server plans, terms, or optional services can change. | Use the plan, term, backup, and total displayed in the current checkout as the source of truth. |
Common mistakes
- Choosing infrastructure before the app. The current workflow starts with the app catalog; older server-first instructions are stale.
- Selecting a WordPress method but not a destination. Both choices are required before Continue becomes available.
- Assuming every existing server is eligible. Use only the compatible server cards xCloud displays for the selected app.
- Comparing plans by price alone. Check CPU, memory, storage, transfer, region, backup, and the number of sites the server will host.
- Treating default HTTPS as automatic DNS configuration. A live domain still needs the DNS setup presented by xCloud.
- Copying generated credentials into notes or screenshots. Store administrator credentials in a password manager and never share them in support captures.
Frequently asked questions
Can I create the server without leaving WordPress setup?
Yes. Select Deploy on a new server under Where should it run? xCloud opens compatible managed-server setup inside the app-first journey.
Why can’t I select one of my existing servers?
The app-first workflow displays compatible server options. If a server is absent, choose one of the displayed cards or create a new compatible managed server instead of trying to bypass the compatibility check.
Is HTTPS enabled for a live domain?
Yes. xCloud v2.8.2 made HTTPS the default when a live domain is selected during site creation. The domain must still resolve correctly for the site to open over HTTPS.
Which plan should I choose?
Choose from the current plan table based on the site’s expected CPU, memory, storage, transfer, and location needs. Review the current term, backup option, and total before confirming because plan availability and prices can change.
Next steps
- Set up your first xCloud managed server if you have not created a server yet
- Set up DNS records for an xCloud server to point a live domain at the new site
- Create a demo site in xCloud when you are not ready to point the production domain
- Use blueprints in xCloud to pre-load themes and plugins on every new site
- Site backups in xCloud to protect the site once it is live
- Why a site or server deletion hangs, and how to finish it safely if you need to remove a site later
- The v2.8.3 app-first workflow and v2.8.2 HTTPS-by-default release notes
Still stuck? Contact our support team for any of your queries.