

How to Set Up and Manage the xCloud MailBox Addon
Updated September 29, 2026 · 12 min read
The xCloud MailBox Addon lets you create a professional email address on your own domain, verify its DNS records, and manage the mailbox from the xCloud dashboard. This guide covers the complete workflow: enabling MailBox, choosing a paid plan, completing the purchase, verifying DNS, creating aliases and forwarding rules, configuring catch-all delivery and mail clients, resetting the password, upgrading the plan, and removing a mailbox safely.
Reseller availability: xCloud Reseller Hosting Program owners can resell paid MailBox plans after creating a plan with their own plan name, SKU, selling price, and active or published status. The free 100 MB MailBox plan cannot be resold.
What the MailBox Addon provides
Each MailBox subscription creates a separate email account with its own storage plan and login. You can manage the account in xCloud and use the provider’s webmail interface or a compatible desktop or mobile email client.
The mailbox management area includes:
- DNS verification for your domain
- Email aliases
- Mail forwarding
- Catch-all delivery
- POP, IMAP, and SMTP connection details
- Password reset
- Plan upgrades
- Permanent mailbox removal
For most people, IMAP is the recommended protocol because it keeps messages, folders, and read status synchronized across devices. POP downloads messages for local use and is better suited to a single-device workflow. SMTP handles outgoing mail.
Prerequisites
Before you start, confirm that you have:
- An xCloud account with access to the team that will own the mailbox.
- A domain you control.
- Access to the domain’s DNS provider so you can add or replace the required records.
- A payment method for a paid MailBox plan.
- A strong mailbox password that you do not reuse elsewhere.
- Permission to manage addons and billing for the team.
If the domain already receives email through another provider, record the existing MX, SPF, and DKIM configuration before changing anything. Replacing MX records changes where new email is delivered.
MailBox availability
| MailBox option | Who can use it | Important condition |
|---|---|---|
| Standard paid plan | Standard xCloud customers | Purchase one plan for each email account you create. |
| Free 100 MB plan | Eligible new mailboxes on supported xCloud-managed infrastructure | Eligibility is shown in the dashboard. Existing paid mailboxes do not automatically become free. |
| Paid reseller plan | Clients of a reseller that has published a MailBox product | The reseller must define the plan name, SKU, selling price, and active or published status. |
| Free 100 MB reseller plan | Not available for resale | The free plan cannot be added to a reseller catalog. |
Set up a new xCloud mailbox
1. Open the Addons page
Sign in to xCloud and select Addons in the main navigation. Find the MailBox card in the Addons List.
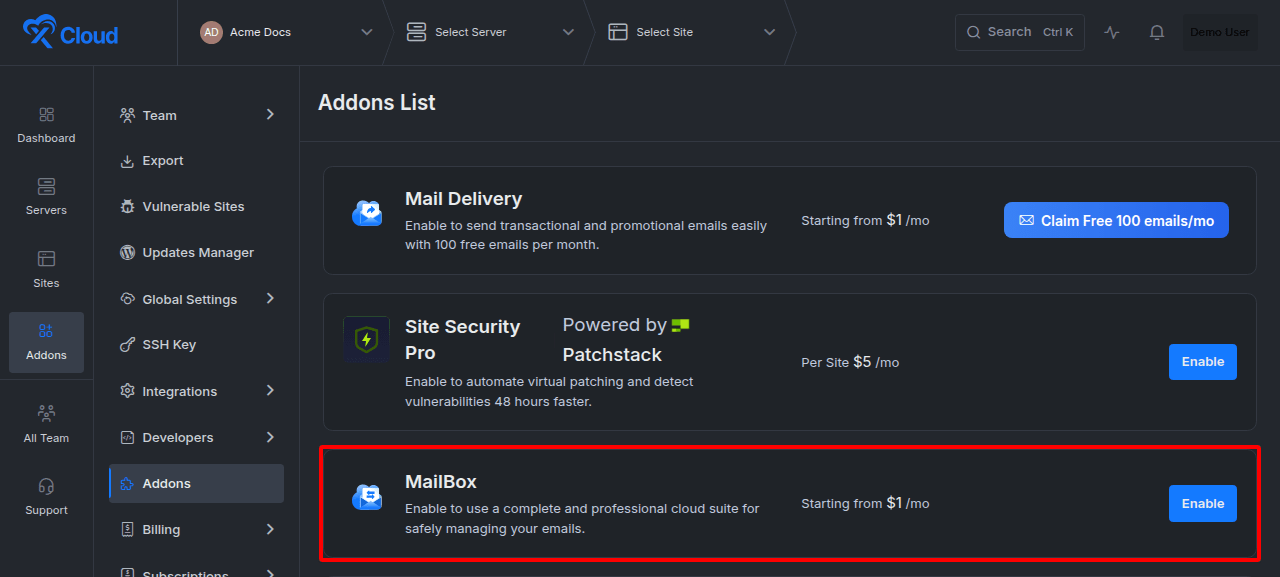
Expected result: The MailBox card shows the action available to your team, such as Enable.
2. Enable the MailBox Addon
Select Enable on the MailBox card. Review the MailBox overview, then select Get Mailbox Addon.
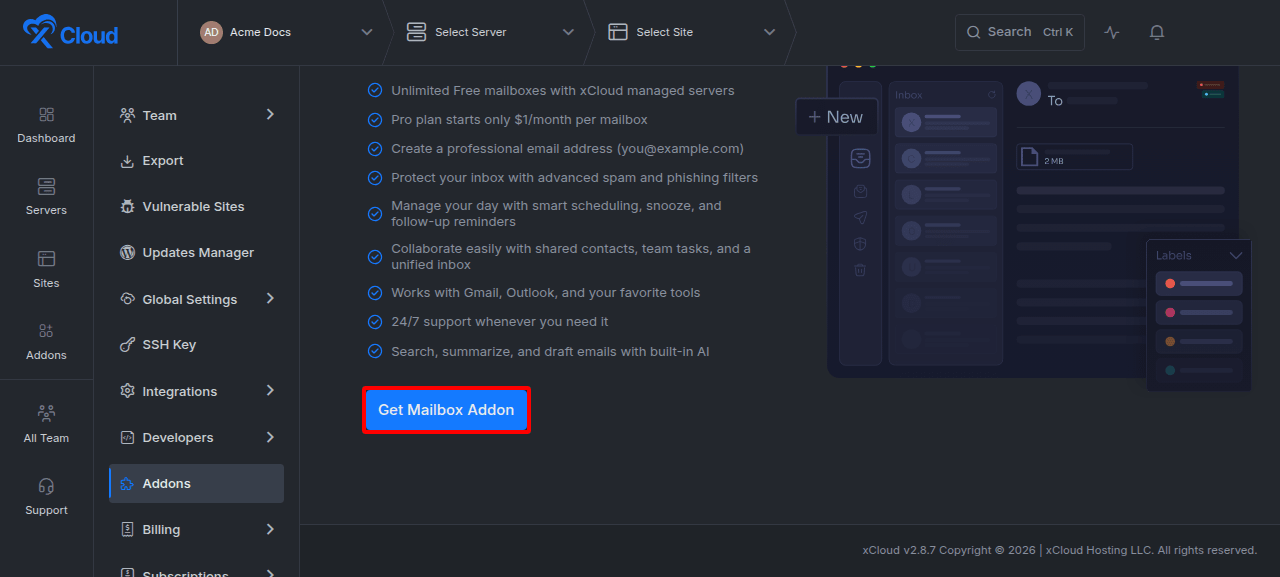
Expected result: xCloud opens the form for the new mailbox account and plan.
3. Enter the mailbox credentials and choose a plan
Enter the email address you want to create and set a strong password. Select the storage plan that matches your needs. The checkout shows the currently available plans, prices, storage, and included features.
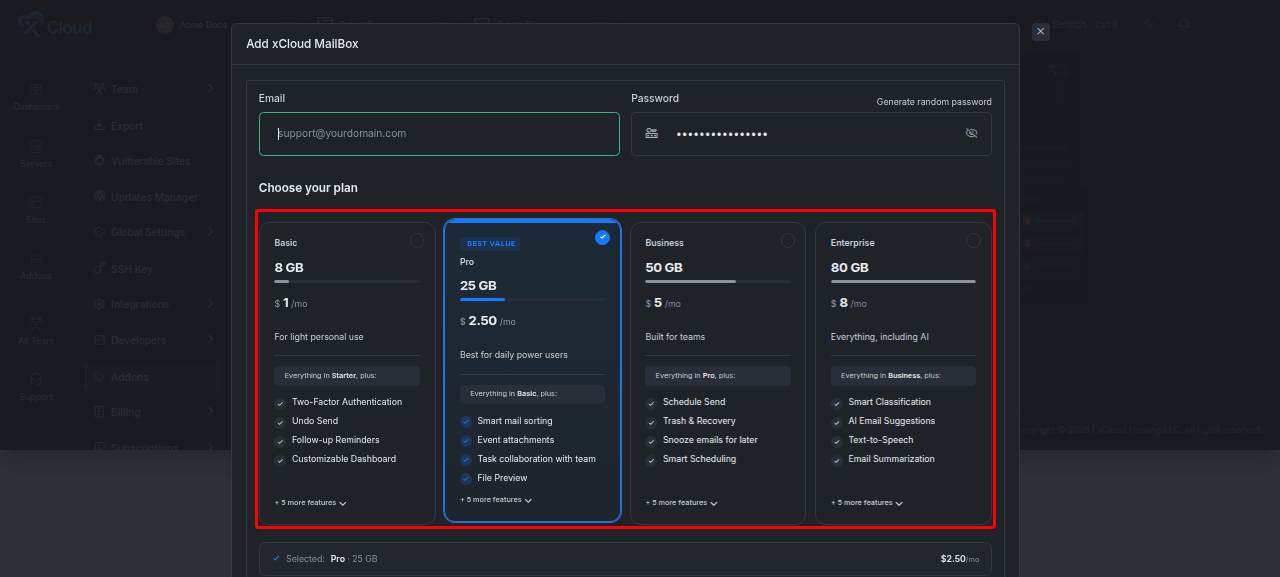
Use a unique password. xCloud masks the password after you save it, and you should store it in a password manager before continuing.
Expected result: The chosen plan is visibly selected and the purchase summary updates for that plan.
4. Review and complete the purchase
Review the mailbox address, selected plan, billing period, and amount. Select Pay & Add MailBox only after confirming the mailbox address is correct.
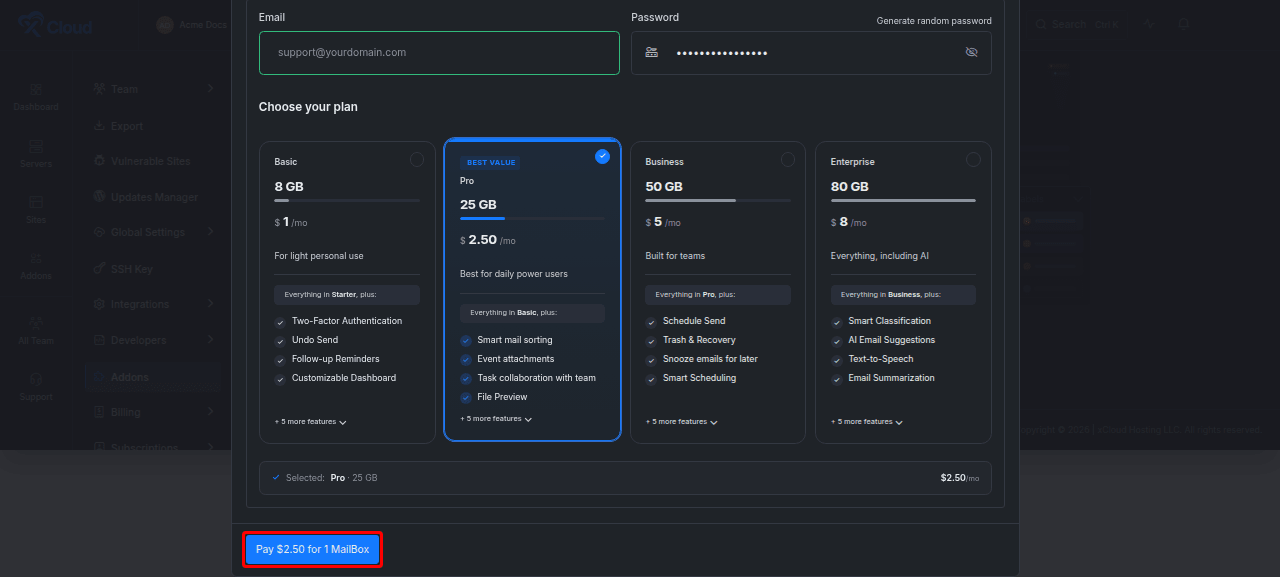
The mailbox address becomes the account identity. If the local part or domain is wrong, cancel the checkout and correct it before payment.
Expected result: xCloud creates the subscription and adds the mailbox to the MailBox Addons list.
5. Confirm the mailbox appears in xCloud
Open Addons → MailBox. The Mailboxes tab lists the email account, plan, status, and actions.
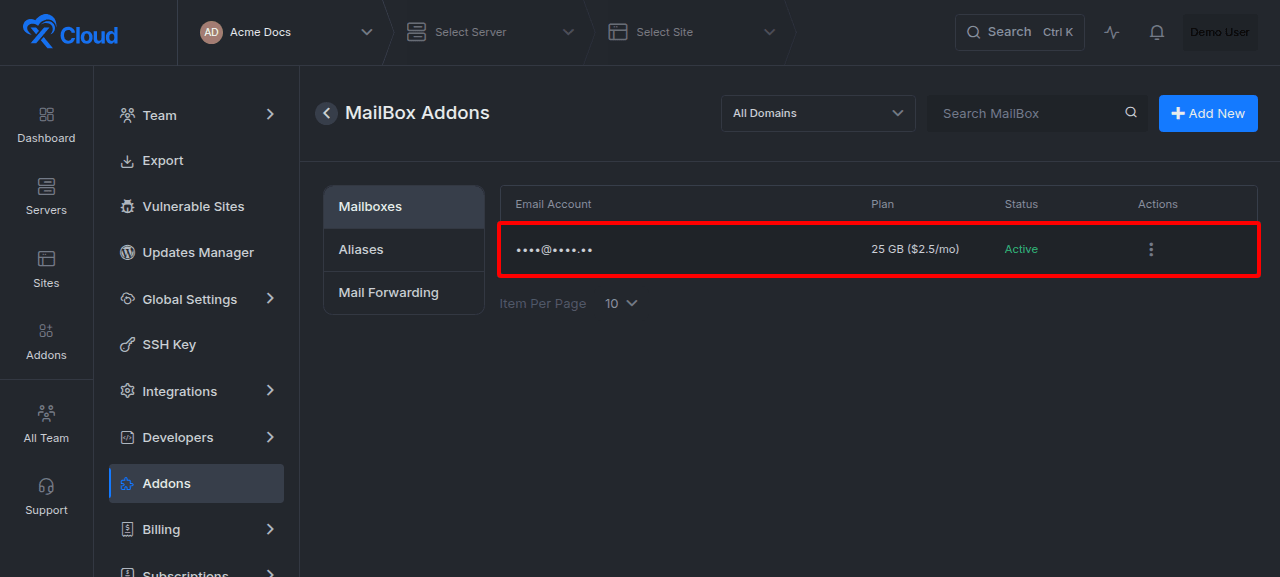
A new domain may remain pending until its DNS records are verified. Do not configure an email client until the mailbox and domain show a usable status.
Expected result: The mailbox appears under the correct team with the expected plan.
Verify the mailbox domain
MailBox needs the DNS records shown in xCloud. These records direct incoming mail to the correct service and authorize outgoing mail for the domain.
6. Add the required DNS records
Open the mailbox’s Manage area and select DNS Settings. Copy each displayed record exactly into your DNS provider. Preserve the record type, name or host, value or target, and any priority shown by xCloud.
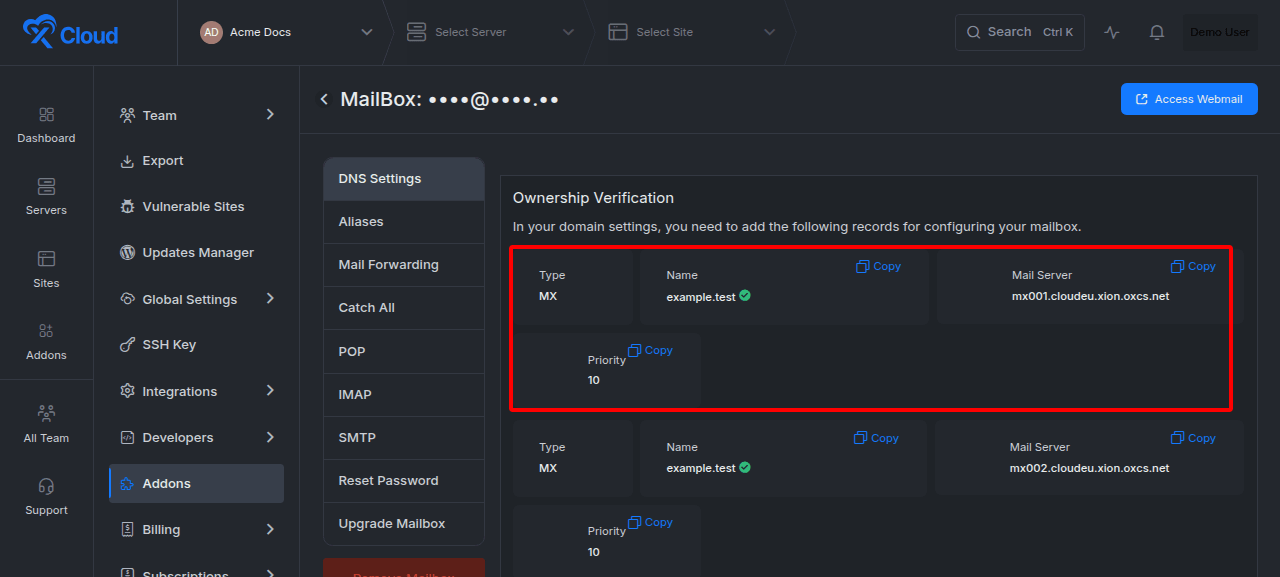
If xCloud offers an automatic DNS option for a connected provider, you can use it instead of entering the records manually. Review the resulting DNS zone before verification, especially when the domain already receives mail elsewhere.
For OX mailboxes, DKIM is handled by the mail provider. Add only the records displayed in DNS Settings. Do not invent an extra DKIM record when xCloud does not show one.
Expected result: Every required record exists in the authoritative DNS zone with the values shown in xCloud.
7. Verify the DNS records
After saving the DNS changes, return to DNS Settings and select Verify Records.
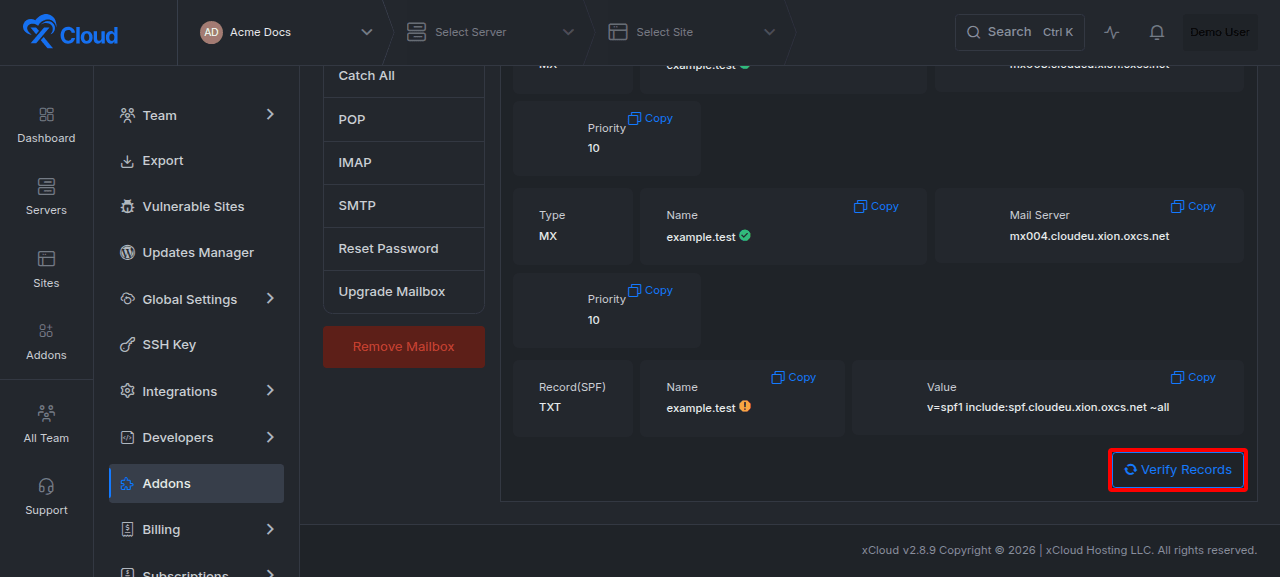
DNS changes can take time to propagate. If verification fails immediately, compare each record with the xCloud values and retry after the provider publishes the changes.
Expected result: xCloud marks the required records as verified and the mailbox becomes available for use.
Access the mailbox
Open the mailbox action menu and select Manage or the available access action. Use the official webmail link provided in the MailBox area to open the inbox.
The webmail interface includes mail, calendar, contacts, tasks, file storage, and the productivity features included with the selected plan. The exact feature set depends on the plan.
xCloud does not host the webmail application at a custom path such as example.com/webmail. You can create a redirect from your own site to the official webmail URL, but the final application still opens on the provider’s webmail address.
Expected result: You can sign in with the mailbox address and password and reach the inbox.
Manage email aliases
An alias is an additional address that delivers to one or more existing mailboxes. It does not create a separate inbox or storage plan.
8. Add an email alias
Open the mailbox management area and select Aliases. Select Add Alias, enter the alias name, choose the domain, select the destination mailbox or mailboxes, and then select Add Alias.
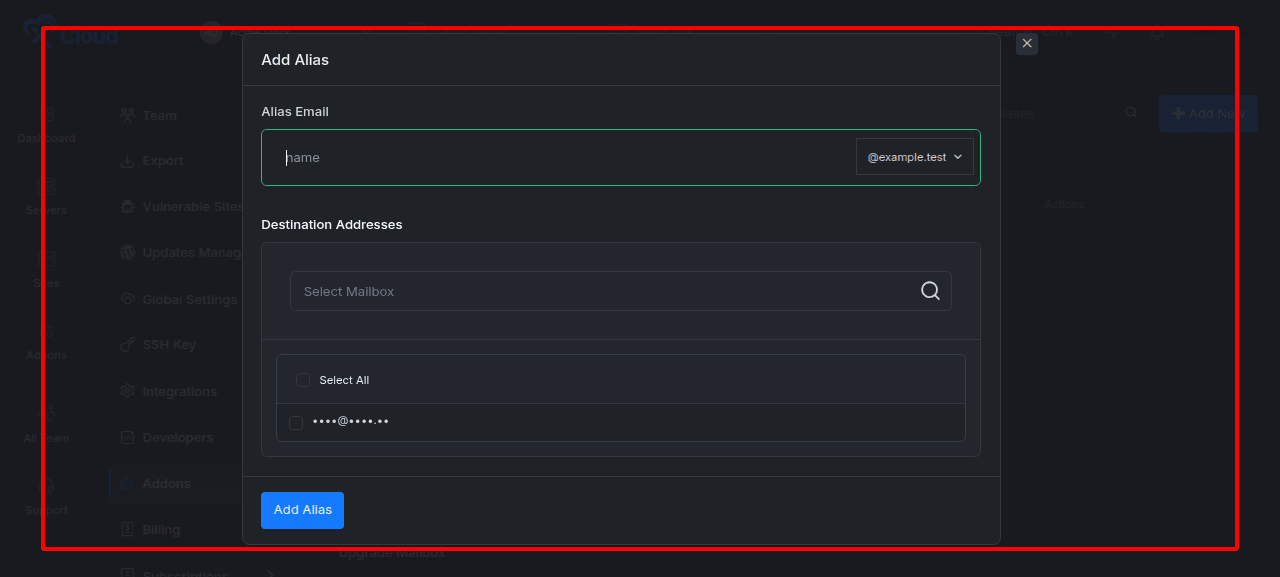
Do not reuse an address that already belongs to a mailbox or another alias. Send a test message to the alias after saving it.
Expected result: The alias appears in the Aliases list and test mail reaches the selected destination mailbox.
Configure mail forwarding
Mail forwarding sends incoming messages from a mailbox to another email address. Use it when someone needs to receive mail in a different inbox.
9. Add or edit forwarding destinations
Open Mail Forwarding in the mailbox management area. Use the row action to edit the mailbox, enter the forwarding destination, and save the forwarding configuration.
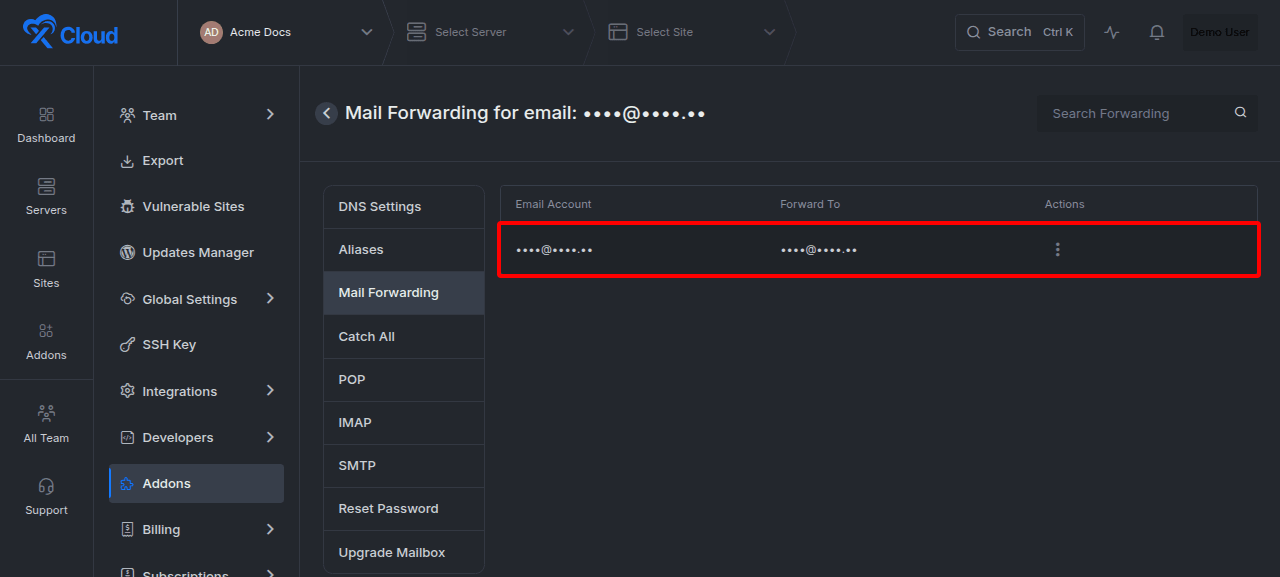
Use a destination you control and send a test message after saving. Confirm whether the original mailbox should keep its own copy according to the options shown in the form.
Expected result: The destination appears in the forwarding configuration and receives a test message.
Enable catch-all delivery
Catch-all delivery sends mail addressed to an otherwise nonexistent recipient on the domain to one selected mailbox. It can reduce missed mail, but it can also increase spam.
10. Configure the catch-all address
Open Catch All, enable the setting, and choose the mailbox that should receive unmatched addresses. Save the catch-all configuration.
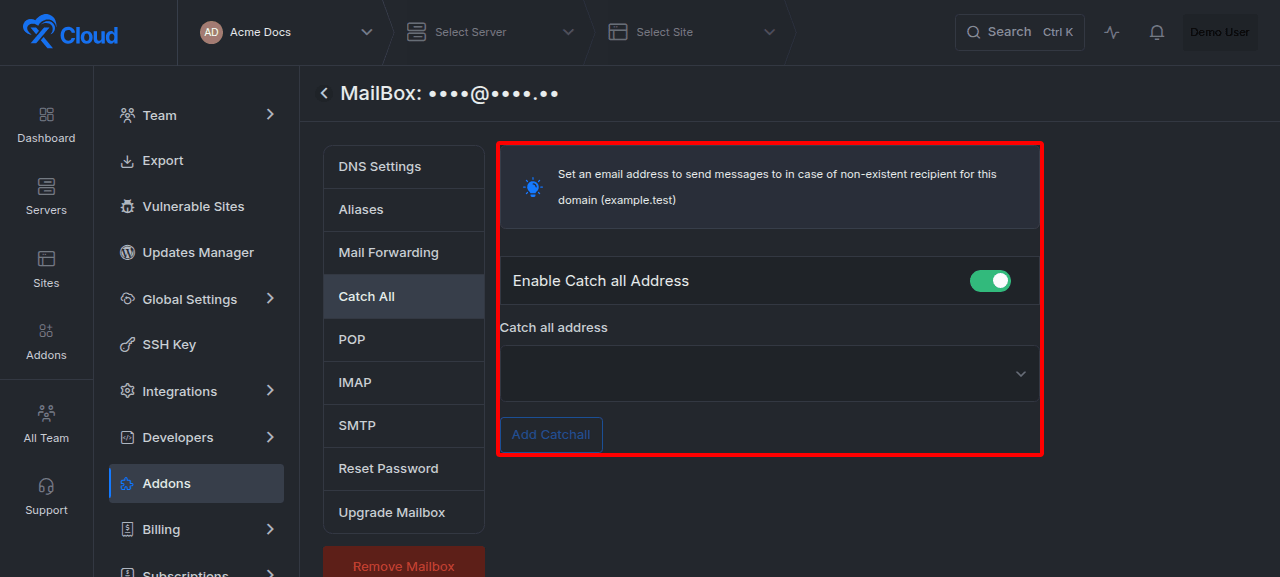
Create explicit mailboxes or aliases for important addresses. Use catch-all only as a fallback.
Expected result: The Catch All section shows the feature as enabled with the chosen destination.
Configure an email client
Use the exact server names, ports, usernames, and encryption settings shown in the mailbox management area. Copy the values instead of typing them from memory.
POP settings
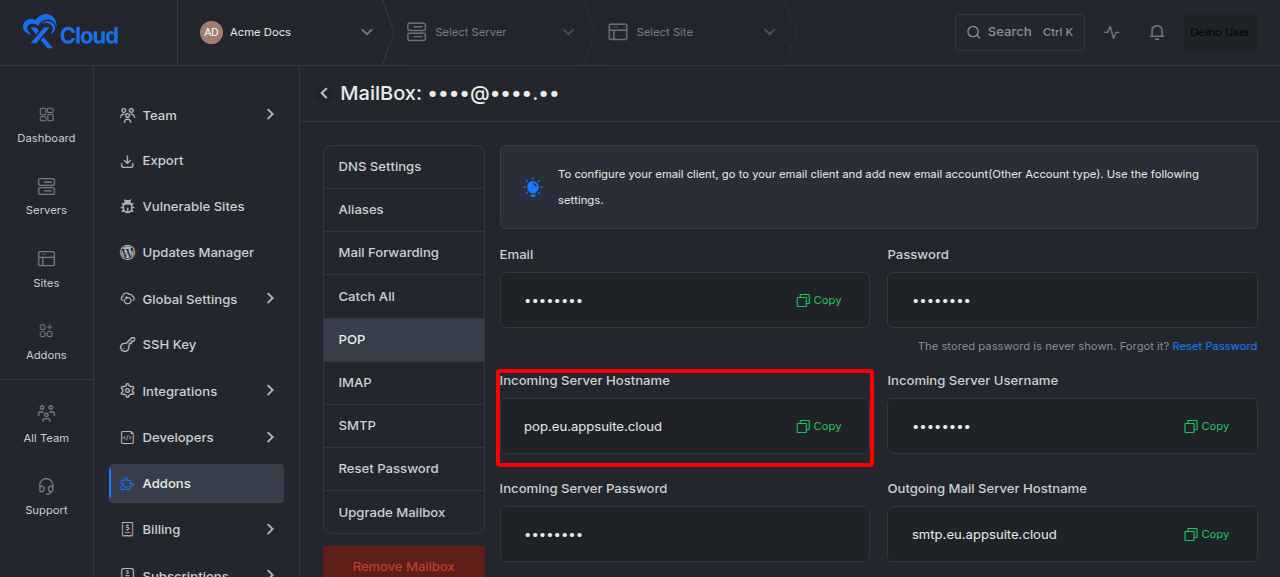
POP downloads messages to the email client. It is best for a single-device, local-storage workflow and does not provide the same cross-device synchronization as IMAP.
Open POP and copy the incoming server settings.
IMAP settings
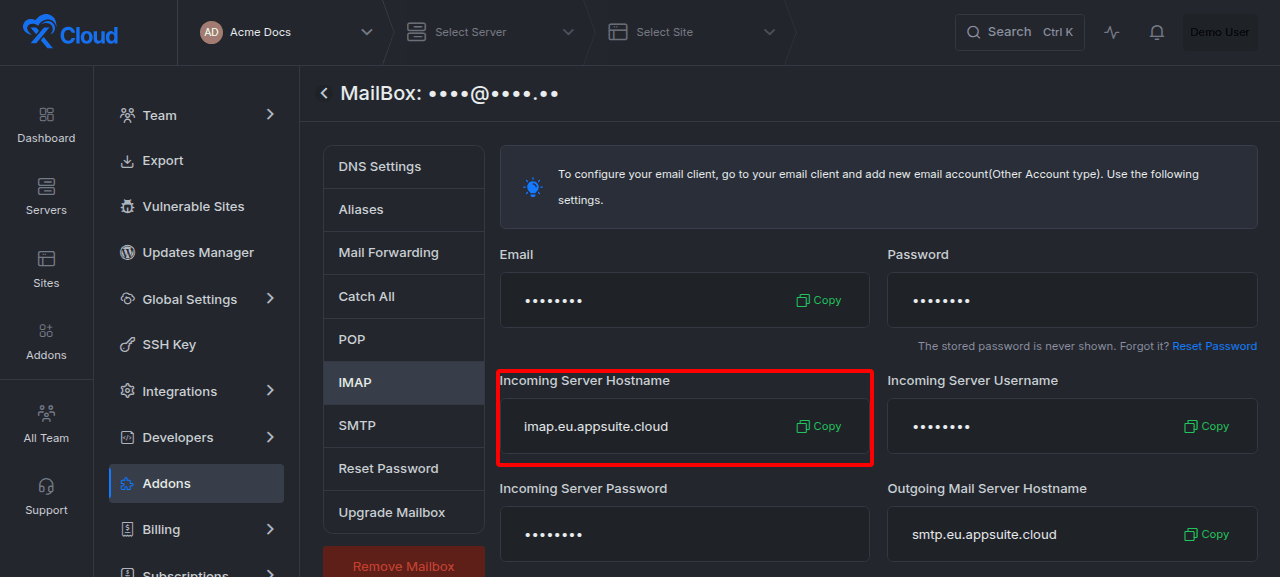
IMAP keeps messages and folders synchronized between the server and all connected devices. Use IMAP for most desktop and mobile email clients.
Open IMAP and copy the incoming server settings.
SMTP settings
SMTP sends outgoing mail. Open SMTP and copy the outgoing server settings into the email client.
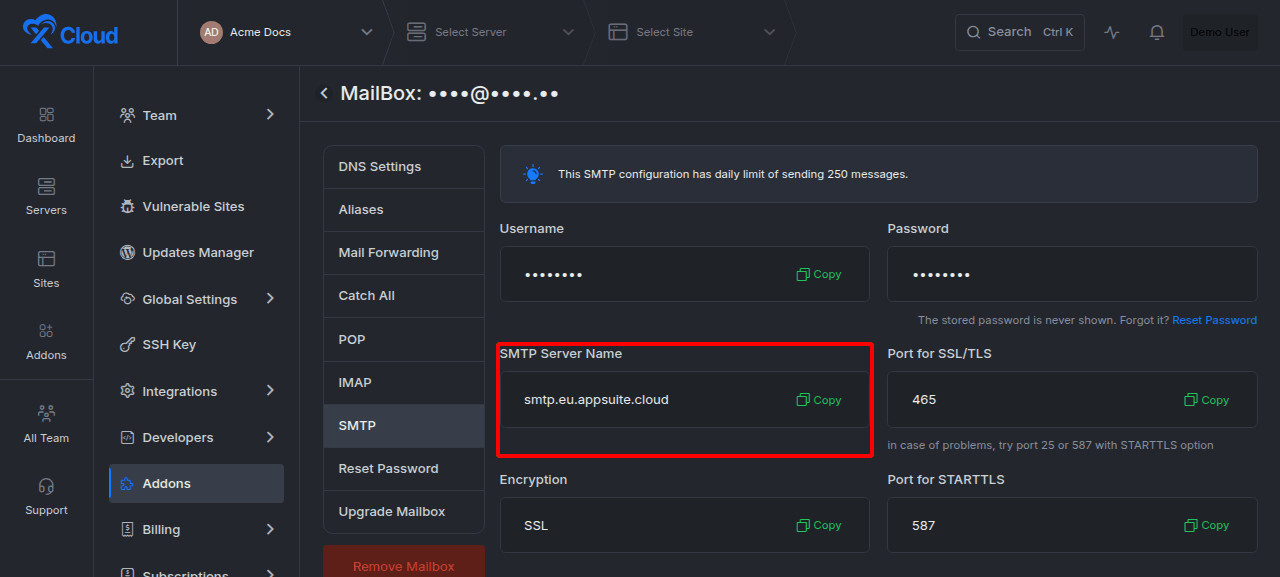
The MailBox SMTP configuration has a daily sending limit of 250 messages. For newsletters, store notifications, marketing campaigns, or other higher-volume sending, use the xCloud Mail Delivery Addon instead of a personal mailbox.
Email client settings reference
| Protocol | Purpose | Recommended use | Values to copy from xCloud |
|---|---|---|---|
| IMAP | Receive and synchronize mail | Multiple devices and most users | Incoming server, port, username, password, encryption |
| POP | Download mail | Single-device or local archive workflows | Incoming server, port, username, password, encryption |
| SMTP | Send mail | Required with either IMAP or POP | Outgoing server, port, username, password, encryption |
Expected result: The email client sends and receives a test message without certificate, authentication, or connection errors.
Reset the mailbox password
Resetting a mailbox password disconnects clients that still use the old password.
11. Set a new password
Open Reset Password from the mailbox action menu or management sidebar. Enter and confirm a strong new password, then select Reset Password.
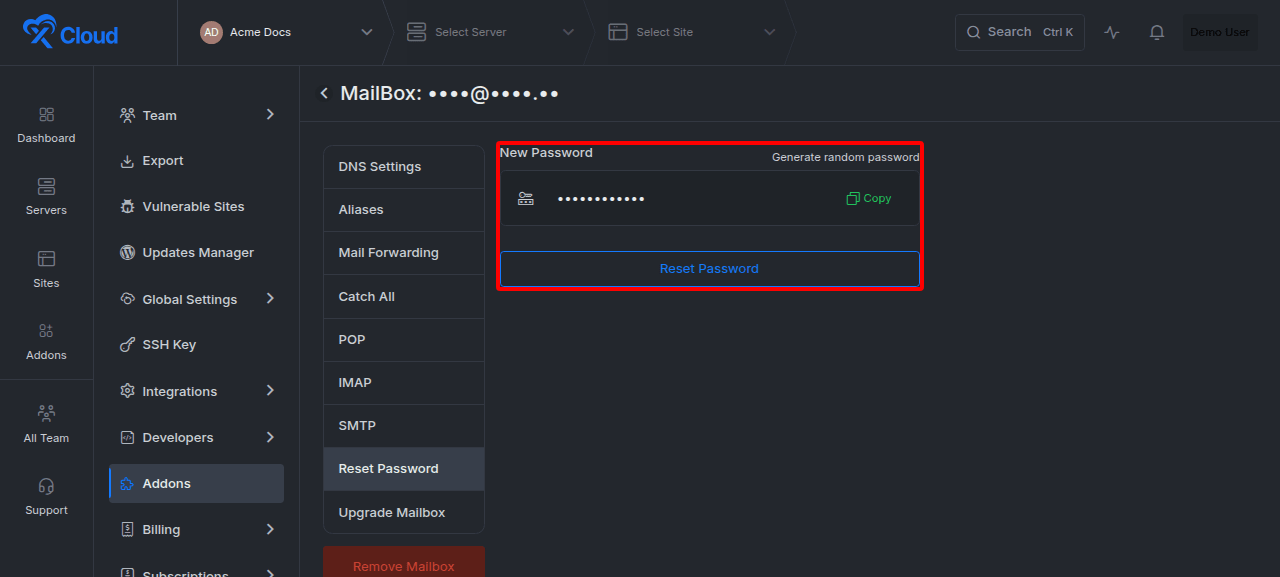
Update the password in webmail, desktop clients, mobile devices, and any application that connects through SMTP.
Expected result: The new password works and the old password no longer authenticates.
Upgrade the mailbox plan
Upgrade a mailbox when it needs more storage or features.
12. Choose a larger plan
Open Upgrade Mailbox, select an available higher plan, review its price and features, and select the upgrade action.
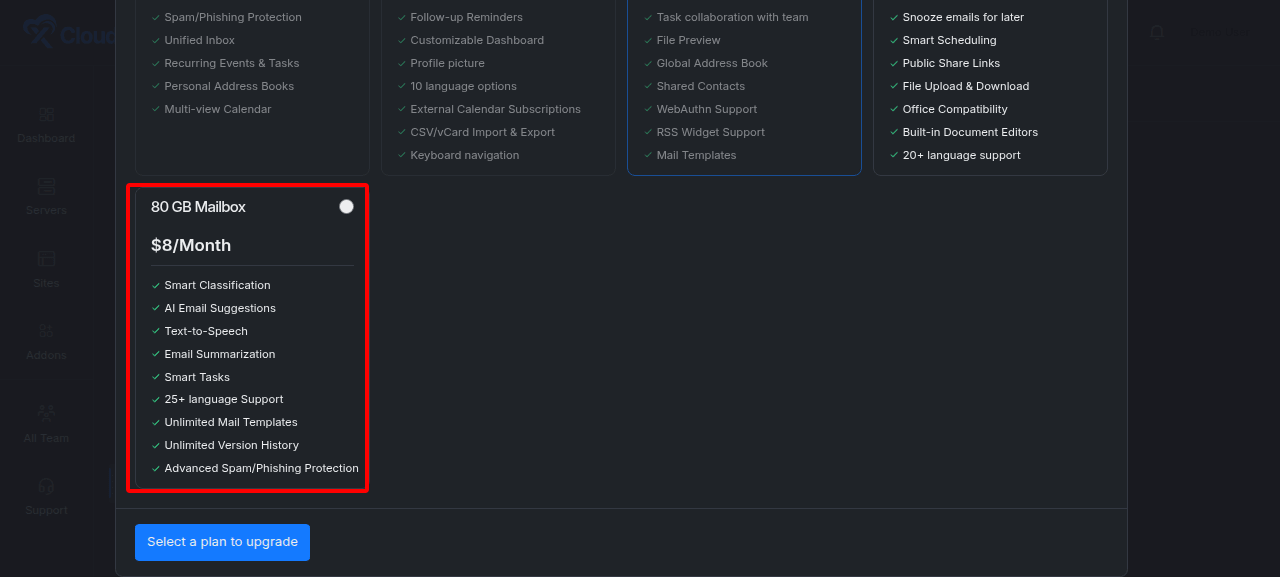
The dashboard exposes the plans available for the current mailbox and provider. If you need a lower tier or an option that is not shown, contact xCloud Support before changing or removing the mailbox.
Expected result: The Mailboxes list shows the new plan after the billing change completes.
Remove a mailbox
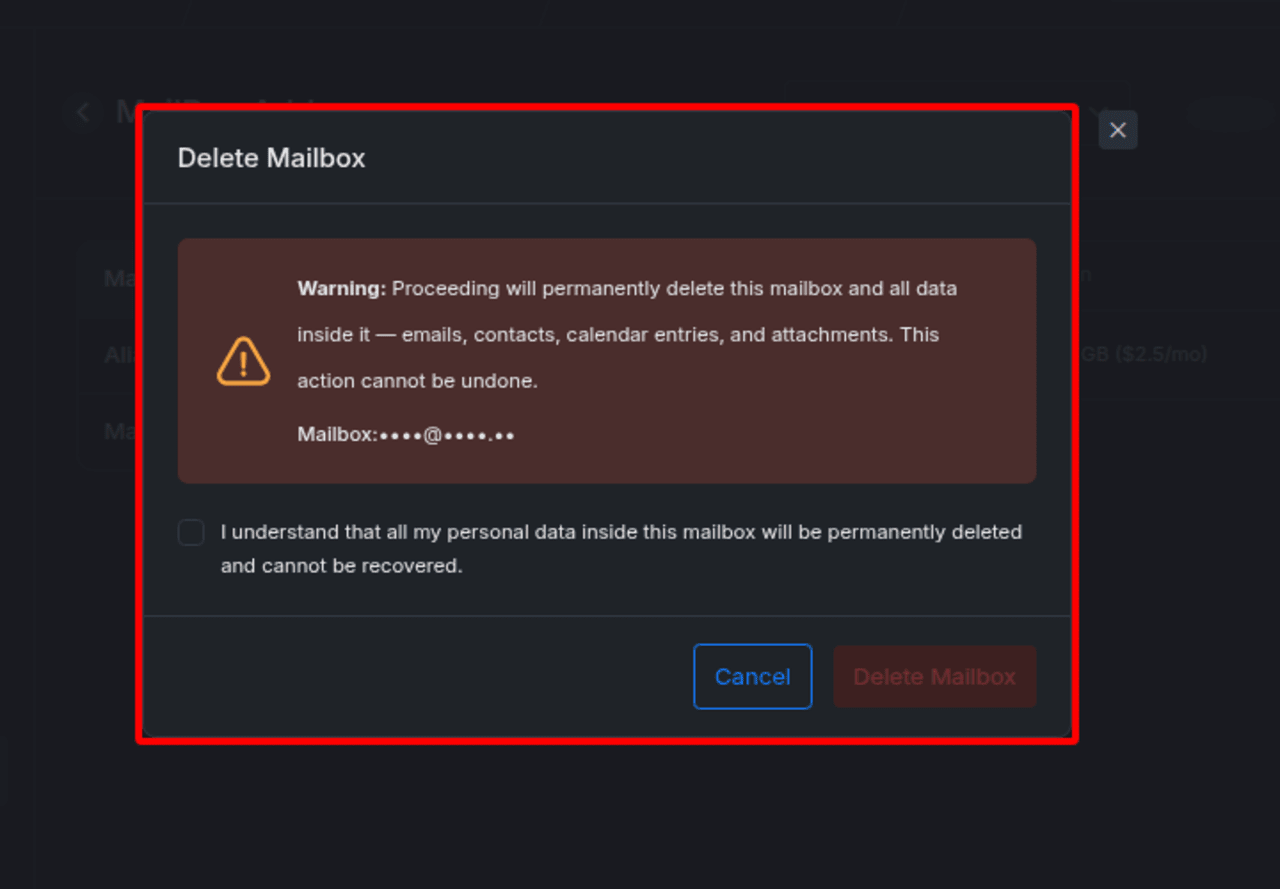
Removing a mailbox permanently deletes the data inside it, including messages, contacts, calendar entries, and attachments. This action cannot be undone.
13. Review the deletion warning
Open the mailbox action menu and select Remove. Read the warning, verify the mailbox, and select the confirmation checkbox only when you intend to delete the account permanently.
Before deleting a mailbox:
- Export or migrate any data you must keep.
- Remove the account from applications that use its SMTP credentials.
- Record or recreate any required aliases and forwarding rules.
- Confirm that another mailbox will receive important addresses.
- Verify that you selected the correct account.
Expected result: The Delete Mailbox button remains disabled until you acknowledge the permanent-data-loss warning.
Verify the complete setup
A working MailBox setup should pass all of these checks:
- The mailbox appears under the intended xCloud team.
- The plan and status are correct.
- All DNS records displayed by xCloud are verified.
- Webmail accepts the mailbox credentials.
- A message sent from the mailbox reaches an external inbox.
- A reply from the external inbox reaches the mailbox.
- Configured aliases deliver to the intended account.
- Configured forwarding destinations receive a test message.
- IMAP or POP and SMTP work in the chosen email client.
- The mailbox password is stored securely and is not shared in plaintext.
Troubleshooting
| Symptom | Likely cause | Fix |
|---|---|---|
| DNS verification remains pending | Records are missing, have the wrong host or value, conflict with old MX records, or have not propagated | Compare every displayed record with the authoritative DNS zone. Remove conflicting MX records only after confirming the migration or cutover plan, then retry verification after propagation. |
| Automatic DNS setup does not verify | The connected DNS integration did not create or refresh every record | Turn the automatic DNS option off and on again, review the resulting records, and retry verification. |
| Mail goes to the previous provider | Old MX records still have priority or DNS caches have not expired | Confirm the authoritative MX response and wait for the previous TTL to expire. |
| Webmail opens a blank page | A browser extension, stale cache, or blocked script interferes with the provider interface | Disable the blocking extension for the webmail site, clear the site cache, and reload. |
| An alias cannot be created | The address already belongs to a mailbox or alias, or the selected domain is not available to the current team | Choose a unique alias under a domain managed by the same team. |
| Forwarding does not deliver | The destination was not saved correctly, the message was filtered, or the source mailbox is not active | Reopen the forwarding settings, verify the destination, check spam, and test direct delivery to the source mailbox. |
| An email client cannot authenticate | The username, password, port, or encryption mode does not match the xCloud settings | Copy all values again from the POP, IMAP, or SMTP page. Reset the password if necessary and update every client. |
| Sending stops after repeated SMTP messages | The personal mailbox reached its daily SMTP sending limit | Wait for the limit to reset or move higher-volume transactional sending to Mail Delivery. |
| A reseller client cannot see a MailBox plan | The reseller has not activated or published the paid plan | Publish the paid MailBox plan and confirm the client is using the correct reseller storefront or account. |
| The free 100 MB plan is missing | The new mailbox, site, server, team, or reseller context does not meet the free-plan eligibility rules | Check eligibility in the dashboard. Use a paid plan when the free offer is unavailable. |
Limits and important considerations
- One mailbox per account: Each email account has its own storage plan. Create separate subscriptions for separate inboxes.
- Team ownership matters: Manage mailboxes for a domain within the same xCloud team. Do not split the same mail domain between unrelated teams.
- Aliases are not mailboxes: An alias redirects mail to an existing inbox and does not have its own password or storage.
- Catch-all increases noise: It receives messages sent to mistyped or invented addresses, including spam.
- IMAP is the default choice for synchronization: POP does not provide the same multi-device state synchronization.
- SMTP is not a bulk-mail service: The mailbox SMTP configuration is limited to 250 messages per day.
- DNS cutovers affect live delivery: Plan the change before replacing a domain’s existing MX records.
- Deletion is permanent: Export required data before removing a mailbox.
Common mistakes
- Creating the wrong mailbox address: Check the local part and domain before payment.
- Publishing incomplete DNS records: Add every record shown in xCloud and preserve the exact priority and value.
- Adding an unnecessary DKIM record: For OX mailboxes, use only the DNS records that xCloud displays.
- Using POP on several devices: Choose IMAP when changes must stay synchronized.
- Using a personal mailbox for campaigns: Use Mail Delivery for higher-volume transactional or marketing messages.
- Forgetting saved clients after a password reset: Update every mail client and application immediately.
- Treating an alias as a separate inbox: Create a mailbox subscription when the address needs independent storage and credentials.
- Calling MailBox unavailable to all reseller clients: Paid plans can be resold after the reseller publishes them. Only the free 100 MB plan is excluded from resale.
- Deleting before exporting data: Mailbox removal cannot be undone.
Frequently asked questions
How is xCloud MailBox billed?
Paid MailBox plans use the billing period and price shown during checkout. Review the current amount before selecting Pay & Add MailBox.
Can I create multiple mailboxes on one domain?
Yes. Create a separate mailbox and plan for each address, and keep the domain’s mailboxes under the same xCloud team.
What is the difference between a mailbox and an alias?
A mailbox has its own login, password, storage, and inbox. An alias has no separate inbox. It delivers messages to an existing mailbox.
Should I use IMAP or POP?
Use IMAP for most setups because it synchronizes messages and folders across devices. Use POP only when you intentionally want a local, single-device download workflow.
Can I use MailBox SMTP for transactional email?
You can send through the mailbox SMTP settings, but the configuration has a daily limit of 250 messages. Use the Mail Delivery Addon for higher-volume application, store, notification, or marketing email.
Can a reseller sell xCloud MailBox plans?
Yes. A reseller can sell paid MailBox plans after defining the plan name, SKU, selling price, and active or published status. The free 100 MB plan cannot be resold.
Can I host xCloud webmail on my own domain?
Not directly. Use the official webmail link shown in xCloud. You can redirect a friendly URL on your domain to that link, but the application still opens on the provider’s webmail address.
Can I downgrade a MailBox plan?
The MailBox interface shows the upgrade options available to the current account. If you need a smaller plan or do not see the required option, contact xCloud Support before removing or replacing the mailbox.
What happens if I remove a mailbox?
xCloud permanently deletes the mailbox and its messages, contacts, calendar entries, and attachments. Export or migrate anything you need before confirming deletion.